Guides
12 iOS settings to change to make your iPhone battery last longer
When your iPhone is in the red (or yellow), these battery-saving settings are going to come in handy to keep it going just a little longer.
Is there anything worse than watching your iPhone battery indicator slip into the red?
Battery capacity on iPhones typically improves every year. The base iPhone 13 is rated to last about 2.5 hours longer than the iPhone 12 did, and the 13 Pro and Pro Max are even more impressive.
But every new iPhone model also comes with a slew of new ways to drain that battery capacity — larger and brighter screens, more advanced media accessories, and an updated iOS 15 loaded with new features.
If you want to help your iPhone’s battery last as long as possible (or are trying to stretch the waning lifespan of an older battery), there are plenty of small tweaks you can make to your settings to avoid using too much juice throughout the day.
Check your battery health — you might need a replacement
If you’ve had your phone for a while, there’s a chance your battery isn't operating at full capacity anymore. You can check the battery’s estimated capacity in your settings.

- In your “Settings,” find and tap on “Battery.”
- On the main “Battery” menu, you’ll see charts tracking your battery capacity and charging habits. Tap on “Battery Health” toward the top of this menu.
- Here, you’ll see “Maximum Capacity” and a percentage signifying your battery health. There’s absolutely no hard and fast rule on when you should seek a battery replacement — it really depends on if your battery life is getting in the way of your average phone usage. An 80 percent battery will still get you through the day but you might want to keep a charger on hand. Anything between 50 and 80 percent will be troubling, but okay as long as you aren’t playing games or streaming videos all day. Anything below 50 percent is when you’re going to want to consider a battery replacement — your phone might feel unusable at this point.
- While you’re here, make sure that “Optimized Battery Charging” is toggled on. This is a feature that can charge your phone more efficiently overnight and reduce aging.
You can also see which apps on your phone have been using the most battery power lately in the “Battery” menu. Take note of the big drainers and focus on them in the steps below.
Use Wi-Fi whenever you can
Wi-Fi uses a lot less power than a cellular connection, so you should always connect to safe, secure networks when they’re available to you.
Use Dark Mode
You’d be surprised at how much battery life you can save by not using bright, white apps all day long. Dark Mode uses black and shades of grays instead for a display that’s easier on your eyes and your battery. The only catch is that Dark Mode conserves the most power on iPhones with OLED displays. Older iPhones with LCDs won’t save quite as much power.
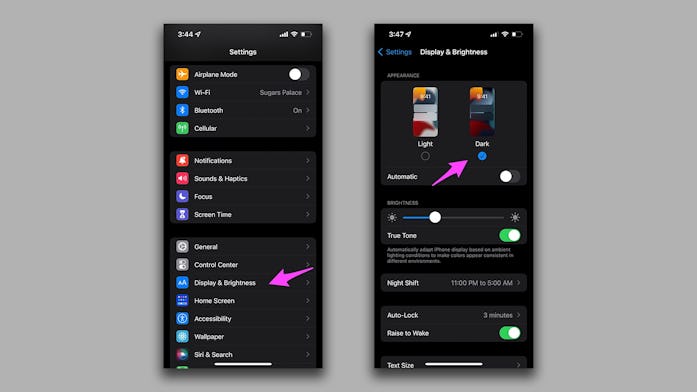
- In your “Settings,” find and tap on “Display & Brightness.”
- Tap on the darkened iPhone screen under “Appearance” to enable Dark Mode.
If you’re not the biggest fan of Dark Mode, give the “Automatic” option on this menu a go. This will turn on Dark Mode in the evening each day, or at a custom time of your choosing.
Turn down your brightness
In the same vein as Dark Mode, reducing the brightness of your screen can extend a battery charge. Unless you’re in a brightly-lit space, you definitely don’t need your brightness turned up high.
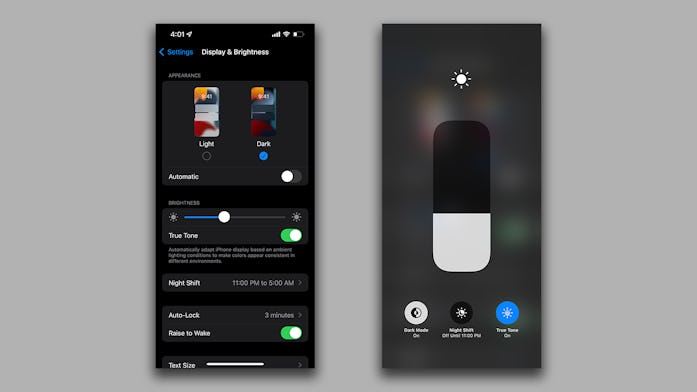
You can turn down your brightness in two places. You can swipe down from the right-hand corner of your screen to access their Control Center and adjust the brightness slider there, or visit the “Display & Brightness” menu in your “Settings.”
Turn your Auto-Lock threshold down
Auto-Lock turns off your iPhone screen if you haven’t touched it in a set amount of time. You should set the Auto-Lock timer as low as you can possibly stand — 30 seconds might be a bit too short for some folks, but no one needs the max timer of five minutes. The shorter this timer is, the faster your iPhone will go black when you aren’t using it, saving precious battery life.
You can find your Auto-Lock settings in the “Display & Brightness” menu.
Disable Raise to Wake
Raise to Wake is the feature that turns your screen on when you pick up your phone. Convenient when you’re checking the time or notifications quickly, but think about how many times your screen jolts to life when you’re just moving it from one place to another. Disabling Raise to Wake cuts out lots of unnecessary screen-on time.
You can find your Raise to Wake settings in the “Display & Brightness” menu.
Turn on Low Power Mode
Low Power Mode will extend the battery life on your phone significantly by reducing the performance of a handful of features. In Low Power Mode, the following services are affected:
- Email fetch
- Background app refresh
- Automatic downloads
- Some visual effects
- Auto-Lock (defaults to 30 seconds)
- iCloud Photos (temporarily paused)
- 5G (except for video streaming)
You’re probably familiar with this mode because your iPhone will prompt you to turn it on when its battery hits 20 percent (and again at 10 percent). But some people swear by keeping it turned on all the time. If none of the features above are key to your iPhone experience, give it a shot.
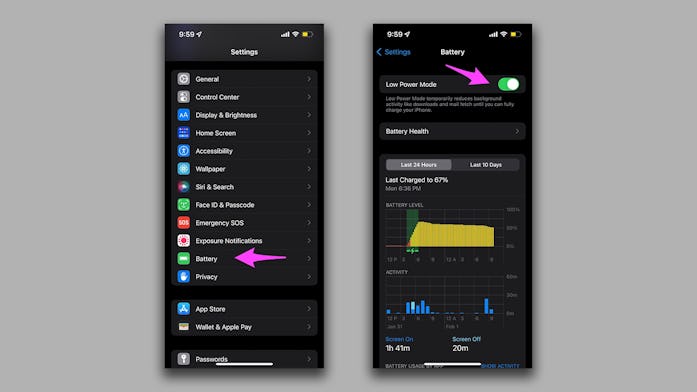
- In your “Settings,” find and tap on “Battery.”
- Make sure “Low Power Mode” is toggled on.
Low Power Mode will automatically toggle off each time your iPhone charges up to 80 percent, so you’ll need to jump back in to turn it on regularly.
Limit background refreshing
All sorts of apps utilize background refreshing so that they are updated and ready to go whenever you open them up. Email apps are fetching new messages, Instagram is refreshing the feed, and news apps are updating with the latest headlines. All this refreshing, even in the background, can drain your battery. All of this background work only saves you a few moments of updating once you open an app, so you might as well just shut it down to save battery.
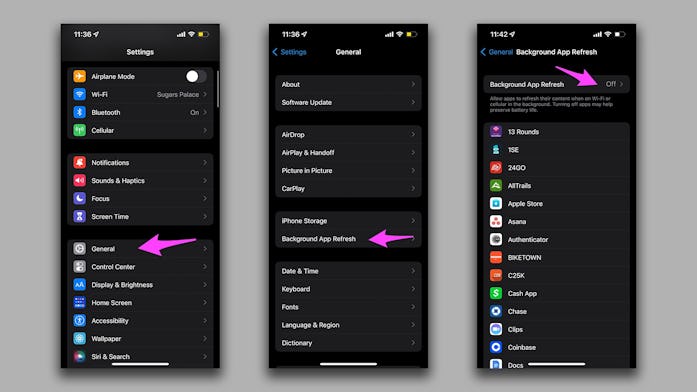
- In your “Settings,” find and tap on “General.”
- Tap on “Background App Refresh.”
- At the top of this menu, make sure “Background App Refresh” is toggled off. You can also select “Wi-Fi” at this point as a middle ground, allowing background refresh to run but only over Wi-Fi connections.
Of course, if there are apps you use regularly that you want to refresh in the background, you can keep the feature on for select apps. You’ll have to adjust each app individually though.
Limit notifications
Every little notification that pops up on your screen chips away at your battery life. Cutting down on notifications you aren’t immediately responding to is an easy way to save a bit of juice (and give your brain a break from constant push notification fatigue).
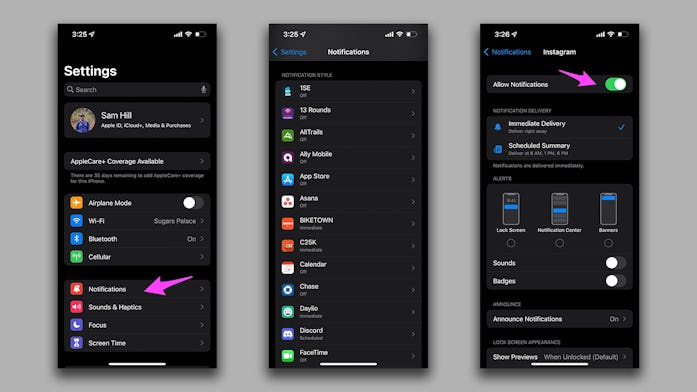
- In your “Settings,” find and tap on “Notifications.”
- Tap on an app you’d like to shut off notifications for. Think about notifications you always ignore.
- At the top of each app’s settings screen, you can turn off notifications completely.
Obviously, you might not want to turn off notifications for every app on your phone. We recommend you set up a Notification Summary for all non-essential notifications, putting in a big round-up that gets delivered to you a few times a day.
Turn off vibrations and haptic feedback
Whenever your iPhone vibrates or provides haptic feedback, the physical motor of your phone is engaged. This takes a bit of extra power. If you can live without the physical reminders for notifications and feedback, we’d recommend you turn both of these off.
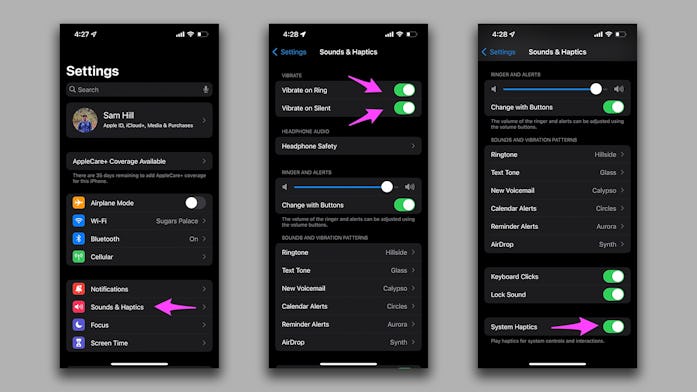
- In your “Settings,” find and tap on “Sounds & Haptics.”
- At the top of this menu, you can toggle off “Vibrate on Ring” and “Vibrate on Silent.
- You can also turn off vibrations for each alert type under the “Sounds and Vibration Patterns” heading. Tap on any alert type, like “Ringtone” or “New Voicemail” and you can change vibration settings at the top of the next menu. If you don’t need vibrations for a certain alert, set it to “None.”
- Lastly, you can toggle off “System Haptics” at the bottom of this menu.
Change your location tracking settings
There are plenty of iOS features that we want using “Location Services,” but there are also lots that have no business knowing where you are. This feature uses GPS, Bluetooth, and Wi-Fi to keep track of your location — all things that chip away at your battery life.
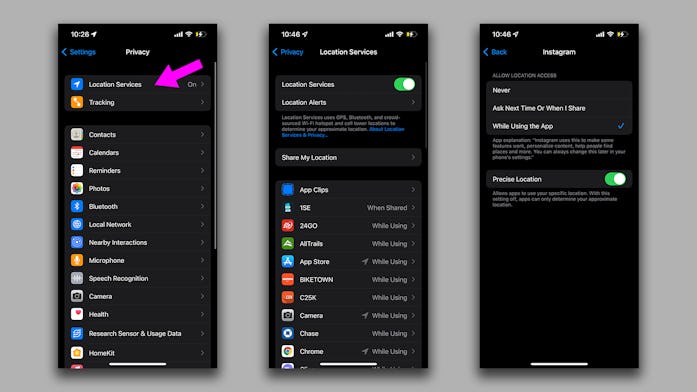
- In your “Settings,” find and tap on “Privacy.”
- Tap on “Location Services” at the top of the menu.
- You can shut off “Location Services” entirely by tapping the toggle here, but chances are you have a handful of apps you want to have location access to, like map and rideshare services.
- It’s a bit tedious, but what you should do is review the list of downloaded apps and change location tracking for each one individually. For apps with helpful location content like delivery apps or fitness tracking, set them to “While Using the App.” If you can’t imagine why an app would need your location, set it to “Never.”
Limit apps that use Bluetooth
It’s possible that you have a handful of apps that are sneakily trying to make Bluetooth connections in the background. A lot of these apps don’t need Bluetooth access to function, so you should shut ‘em down to save a bit of power.

- In your “Settings,” find and tap on “Privacy.”
- Scroll down to tap on “Bluetooth.”
- In this menu, you can see every app on your phone that has requested Bluetooth access. You’ll want to keep Bluetooth toggled on for apps connected to accessories you use regularly like fitness trackers or smart lighting set-ups, but you can turn it off for apps for banking, retail stores, streaming services — anything that doesn’t seem like it would need to connect to something else.
If you’re really looking to limit Bluetooth and save some juice, you can disable Bluetooth entirely on this menu. Of course, this would keep you from using Apple accessories like AirPods Pro or an Apple Watch.
Turn on Airplane Mode in low signal areas
When you’ve got absolutely no cell signal, or even just a low one, your iPhone will repeatedly try to find a signal, slowly draining your battery. If there’s no chance you’re going to run into a good signal anytime soon and don’t desperately need one, you might as well switch on Airplane Mode. With this mode enabled, your iPhone will stop hunting for a signal.
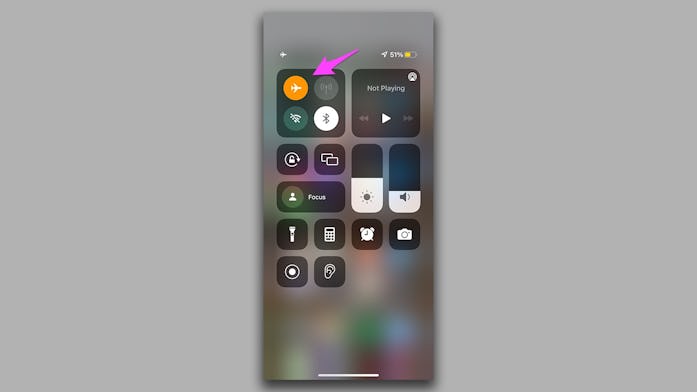
- From any screen on your iPhone, swipe down from the right-hand corner near the battery and Wi-Fi icons to open the Control Center.
- Tap the airplane icon to enable Airplane Mode. The icon should turn orange.
