Guides
How to completely wipe your laptop before selling it
Mac or PC — you need to completely erase your personal data from your device before passing it off.

If you’re planning on selling your laptop because you’ve upgraded to a newer model or are making a system switch (Apple’s new M2 chip sounds very exciting), you don’t want to hand over your device to the first guy to respond on Facebook Marketplace and call it a done deal.
While signing out of all your accounts and deleting your files may look like a clean slate from your end, you could still be turning over plenty of your personal data to a stranger if they have any sort of data recovery know-how. To truly protect yourself and your data, you’re going to want to completely factory reset your laptop.
How to wipe a Windows laptop
We’re resetting a PC running Windows 11 in this guide. The steps are fairly similar for older versions of Windows, although some of the menus may exist in alternate locations. They’ll be very nearby though!
Backing up your files
The very first thing you need to do is backup the files on your laptop that you’d like to save. There’s nothing worse than deleting everything on your device with reckless abandon only to remember those precious photos or important documents that you only had stored on its drive. There are three easy ways to ensure your data is backed-up properly:
- Create a system image: A system image is a copy of all data on a drive volume, which is perfect for recovering your system after a crash or transferring everything (including the smallest of settings tweaks) to a new PC. This process might sound daunting, but it’s quite simple. You only need an extra drive with enough room to store the system image.
- Use OneDrive: Microsoft’s cloud-based storage solution is great for backing up photos, documents, and more to a safe place before you erase your laptop. All Microsoft users get a free 5GB chunk of storage, and there are paid plans if you need more room. You can easily set up favorite folders that sync to the cloud automatically.
- Use an external hard drive: If you’d rather have your files on a physical hard drive (or don’t want to pay for cloud storage) you can use an external hard drive to save your files. This will be a bit longer of a process, as you’ll have to pick the files you’d like to save manually and move them over to your storage device.
Erasing your laptop
Now that you have everything stored safely elsewhere, it’s time to erase everything you don’t need and reset the device to the factory settings.
- Open the Start Menu and find Settings, either by clicking on the gear icon in the Pinned apps section or looking for Settings using the search bar.
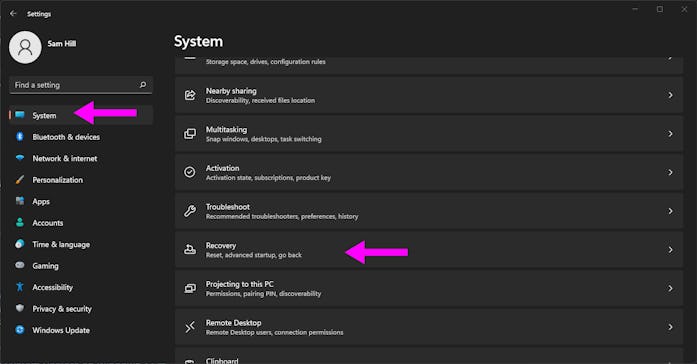
- In the left-hand sidebar, click on “System.”
- Find and click on “Recovery” in the “System” menu to the right.
- Under the “Recovery options” header, click on the “Reset PC” button.

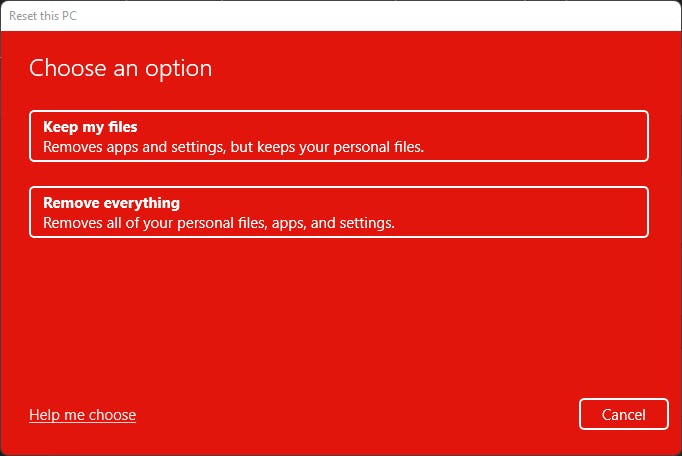
- In the recovery pop-up window, click on “Remove everything.”
- On the next screen, click on “Local reinstall.”
- On the “Additional settings” screen, click the “Change settings” button below the list of current settings. Make sure the toggles under “Clean data?” and “Delete files from all drives?” are switched to “Yes.” Click “Confirm” once you've made these changes.
- Back on the “Additional settings” screen, click “Next.”
- On the next screen, once you’re ready for a full reset, click on the “Reset” button to start the process.
The entire reset process could take a few hours, but once it's done your files, accounts, settings, and apps will be completely wiped from the device and a new version of Windows 11 will be installed. Upon starting the computer up again, you should be met with an out-of-the-box set-up menu, which you can leave untouched for the next owner.
How to wipe your MacBook
Wiping a MacBook takes no time at all. Because Apple has regularly upgraded security and privacy features with each model, more recently released laptops will be easier to erase.
Backing up your files
Most methods for resetting a MacBook are going to give you plenty of reminders and opportunities to save your files before hitting the hard restart button, but it’s always good to double-check these things. Make sure everything you want to keep — photos, important documents, etc. — is all saved somewhere other than your laptop’s hard drive. There are a few easy ways to ensure everything is safe:
- Use Migration Assistant: If you’re swapping out your current Mac for a newer model, you can use Migration Assistant to move all of your content over to your new device without any hiccups.
- Use Time Machine: Time Machine is Apple’s built-in backup feature. If you have a large enough external hard drive, you can create a backup of your entire system that you can access or install on a new Mac later.
- Use iCloud: Most of your key files are probably already backed up to your iCloud storage anyway. Give it a look and make sure everything is there, or upgrade your storage if you need it.
Erasing your laptop
As we said, if you’re using a newer MacBook, this process is going to be a lot easier. If you've upgraded to macOS Monterey on a Mac with Apple silicon or a Mac with the Apple T2 Security Chip, follow the steps below and ignore what comes after.
- Click on the Apple icon in the upper left corner of your screen and select “System Preferences.”
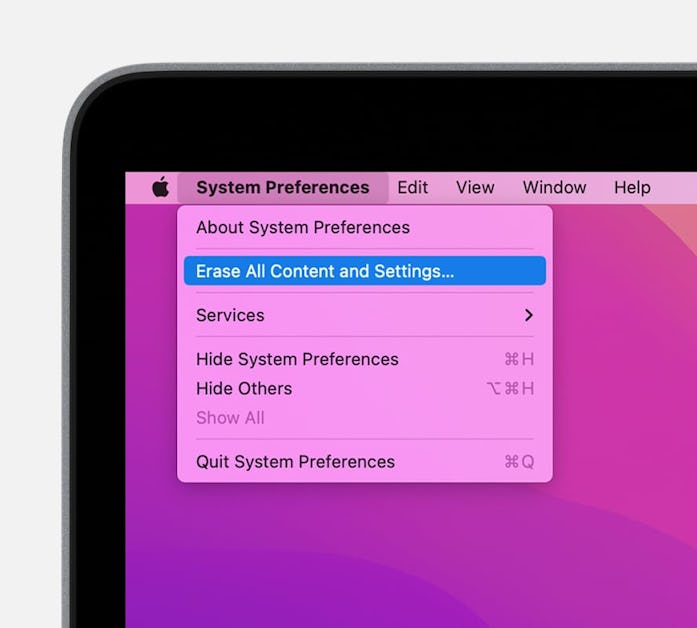
- Return to that same corner of your screen, click on “System Preferences,” and select “Erase All Content and Settings” from the drop-down menu.
- Erase Assistant assistant will open and prompt you to enter your Apple credentials.
- If you're asked to back up your Mac before resetting it, you can open Time Machine and back up to an external storage device from this menu. If you’ve already handled backing up your files, click on “Continue.”
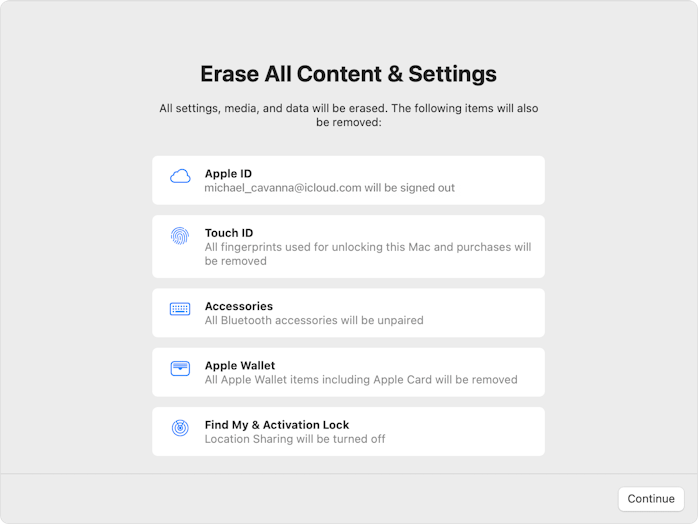
- The next menu will list everything that is going to be removed from your device. Review this list and then click ”Continue.”
- You will be asked to enter your Apple ID password to continue.
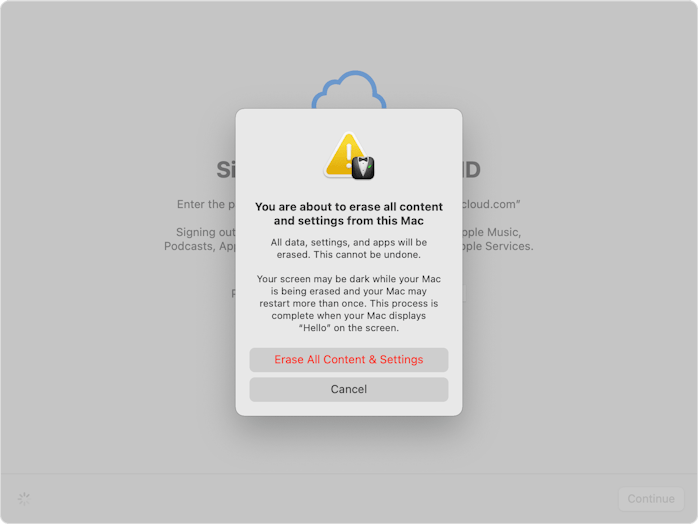
- You’ll be given a final warning that everything on your MacBook is about to be deleted. Click “Erase All Contents & Settings” to proceed.
- Your Mac restarts and shows a black screen or progress bar as it resets.
- Upon completion, you may be asked to connect to a Wi-Fi network on a screen titled “Active Mac.” Connect to your preferred network and click “Restart.”
Your Mac will restart once again and return to an out-of-the-box state. If you’re selling your MacBook or passing it off to someone else, leave it as-is so the next user can set the device up properly.
Erasing an older MacBook
If you tried to find the menus above and couldn’t manage to on your MacBook, you’re probably using a slightly older model that doesn’t have these easy-reset features. No problem — you can still erase all traces of yourself from your MacBook. It’s going to take a little extra effort. Here are a few tasks you’ll need to complete manually after backing up your files:
- Sign out of iTunes: If you’ve used iTunes to purchase anything, your account information is going to be stored there. In iTunes, find your “Account” menu > Authorizations > Deauthorize This Computer to sign out of iTunes.
- Sign out of iCloud: You’re also going to want to remove your iCloud account. Click the Apple icon in the upper left-hand corner of your screen, select System Preferences > Apple ID > Overview > Sign Out (toward the bottom of the window).
- Sign out of iMessage: Lastly, you should sign out of iMessage. Open up the Messages app > Messages > Preferences > iMessage > Sign Out.
Now it’s time to complete the reset of your MacBook.
- Restart your Mac. Immediately hold the “Command” and “R” keys to start up your laptop from macOS Recovery.
- If asked, choose a user profile you know the password for and enter it when prompted.
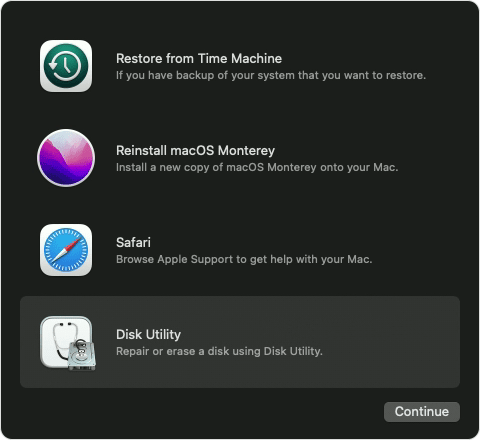
- From the pop-up window, select “Disk Utility” and click “Continue.”
- From the left-hand sidebar, select “Macintosh HD.”
- Click the Erase button in the toolbar. You may be asked to type in “Macintosh HD” into the name form. The “Format” form should be left with whatever Disk Utility automatically recommends — it’ll be either “APFS” or “Mac OS Extended (Journaled).”
- Click “Erase.” This button could also read “Erase Volume Group.”
- If asked, enter your Apple ID and password.
- After the erasure is complete, select any other internal volumes in the sidebar, then click the delete volume (–) button in the toolbar to delete that volume.
- Quit Disk Utility to return to the Utilities window.
- You can click on “Reinstall macOS” in this menu to get the MacBook back in working condition, or you can pass off that task to whoever you’re giving the laptop to.
