Guides
How to use Apple’s Hide My Email to mask your real email address
Apple’s new security tool for iOS and macOS lets you easily create randomly generated email addresses to use instead of your own. Perfect for shopping sites.

Every website wants your email address these days. Whether it’s a shopping outlet trading discounts for data, apps selling your info to advertisers (even if you ask them politely not to), or even your wireless carrier tracking your web activity, it’s hard to go anywhere online without handing over personal information.
What is Hide My Email?
With the release of iOS 15 and subsequent updates, Apple has been releasing new security features like Private Relay for its customers for a more peaceful online life. One major (and still lesser-known) feature is Hide My Email, which allows Apple users to generate unique, random email addresses to use around the web instead of their real, everyday address. These fake/token/dummy addresses can be used to sign-up for newsletters you aren’t sure of yet or shopping platforms that you don’t want spamming your inbox.
Hide My Email is very easy to use, too — creating these dummy addresses takes just a couple of taps to set up and there’s a good management menu built-in so you can use addresses for multiple accounts or ditch them down the road.
Everything you need to use Hide My Email
To use Hide My Email, you’ll need an Apple device operating on iOS 15, iPadOS 15, macOS Monterey, or later. If you haven’t updated your device to iOS 15 yet, you won’t see Hide My Email or any of the other new features that came with its release.
You, or someone on your Family Sharing plan, will also need to have an iCloud+ storage plan set up to access this feature.
Apple has introduced this feature to lure users deeper into its ecosystem, so it’s important to note that this tool works best with Apple services. Hide My Email works great and is easily accessible on Safari, Apple’s native Mail app, and while signing up for subscriptions through apps in its store. You can still use this tool if you use Google Chrome and Gmail, although it’s a bit less user-friendly at points.
How to use Hide My Email on an iPhone or iPad
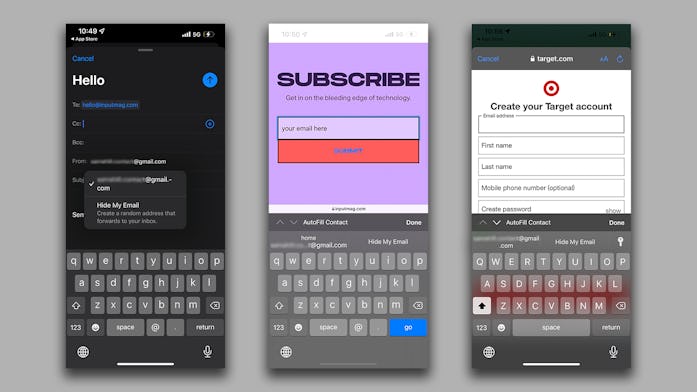
- To use Hide My Email, navigate to an email form in the Mail app or Safari and tap it like you would when entering your own email.
- Underneath the email form, “Hide My Email” should appear as a form-fill option, along with any other auto-fill options you’ve set up on your device.
- Tap “Hide My Email” and an iCloud menu will appear from the bottom of your screen that explains the feature. This screen will also show a randomly generated email that you can use for this service and save on your iCloud+ account. If you’d like, you can change the generated email by tapping the refresh icon on the left-hand side of the address.
- Tap “Continue” once you’re good with the generated address. On the next screen, you can choose a real email address that the fake address will forward to (it will default to the primary email address on your iCloud+ account). You can also leave a note attached to the address to remind yourself what it's being used for. This will be helpful once you’ve got a bunch of addresses set up and need to manage them. Tap the “Use” button to continue.
- The email form on the email, website, or app you’re using should populate with the fake email address. Continue the sign-up as normal. Now you’ve got an account for this service without your email address being attached to it!
Using this tool for every newsletter and website on the internet is great, but the number of emails you’ve created can get a bit out of hand and might need some managing down the road. If you’ve decided to cut off a fake email completely, or want to use one of your generated email addresses for a service through Chrome or elsewhere, you can find all your Hide My Email creations in your Settings app.
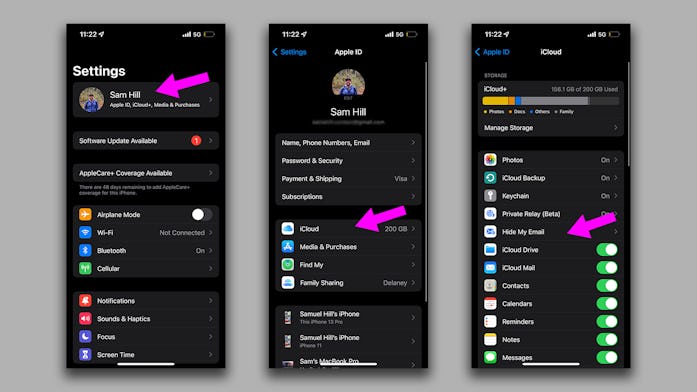
- Open your “Settings” app.
- Tap on your profile photo and name at the top of this menu.
- In the “Apple ID” menu, find and tap on “iCloud.”
- In the “iCloud” menu, find and tap on “Hide My Email.”
- Here, you’ll find a list of all the randomly generated email addresses created using the Hide My Email tool. If you tap on an address from this list, you can see your notes, copy the address to use elsewhere, or deactivate the email address. Under the giant list of email addresses in the main menu, you can change your forwarding address at any time. You can also view a list of your deactivated email addresses.
How to use Hide My Email on a Mac
If you’re running macOS Monterey or later, Hide My Email will look exactly the same on your Mac as it does on your other devices.
If you click on an email form in the Mail app or on Safari, there will be a “Hide My Email” button that you can click to randomly generate a fake email address.
To view your Hide My Email settings and all the email addresses you’ve created, follow these steps:
- Open “System Preferences” by clicking on the Apple logo in the top left-hand corner of your screen and selecting it from the drop-down menu, within Launchpad or the Applications folder in Finder, or search for it using Spotlight.
- Make sure you’re signed in with your Apple ID (you probably are) and click the “Apple ID” button next to your name at the top of the “System Preferences” menu.
- Find and click “iCloud” in the left-hand sidebar.
- Find “Hide My Email” in the list that appears and click “Options” beside it. Here you’ll have the same options as you do on mobile — you can view all your addresses, deactivate them, and change your forwarding address.
